This guide explains how to send emails with PowerApps by using the Office 365 Outlook Connector. There are other ways to send emails within Microsoft PowerApps like the SMTP Connector. Using the Office 365 Outlook Connector is probably the most common and easiest way to send mails, since we are on the Microsoft platform anyway.
This article starts with a How To send emails with PowerApps example for a very simple example: One recipient, plain text, no attachments etc. All the advanced topic are discussed after the step by step guide on sending an email on a button click. Simpley use the links below to navigate to your topic of interest or read the whole article.
Let me know in the comments, if there are still some open questions!
Hint: In case you have a long-lasting task, it might be better to send an E-Mail with Power Automate.
- Step by step: How To Send Emails With PowerApps
- Multiple recipients
- CC and BCC (carbon copy and blind carbon copy)
- Priority / Importance
- Email with attachment
- Email with HTML body
- Send email with hyperlink
- Send email to current user
- Send email to manager
- Send email as different user
- Setting reply to
- Line break in email body
- Email with button in body
- Launch send email
Step by step: How To Send Emails With PowerApps
PowerApps Send Email Example: Send an email on button press with Power Apps Office 365 Outlook Connector.
-
Go to a Power App in your browser
-
Click on data icon, click ‘Add data’, search ‘outlook’ and select ‘Office 365 Outlook’
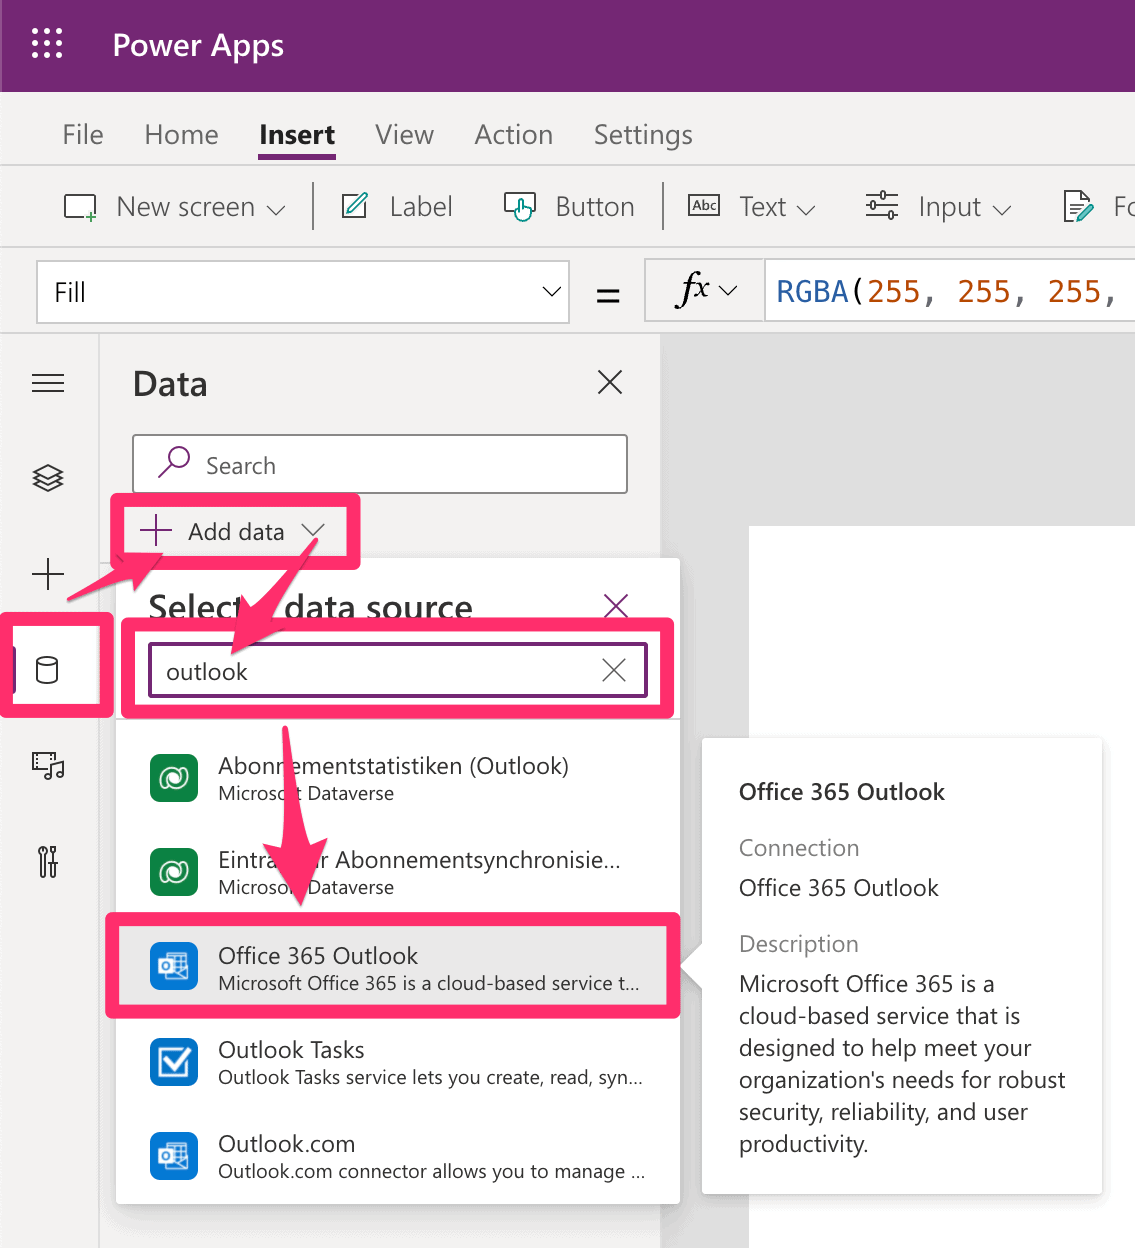
Add Office 365 Outlook Connection
-
Select the account you want to use for the email sending
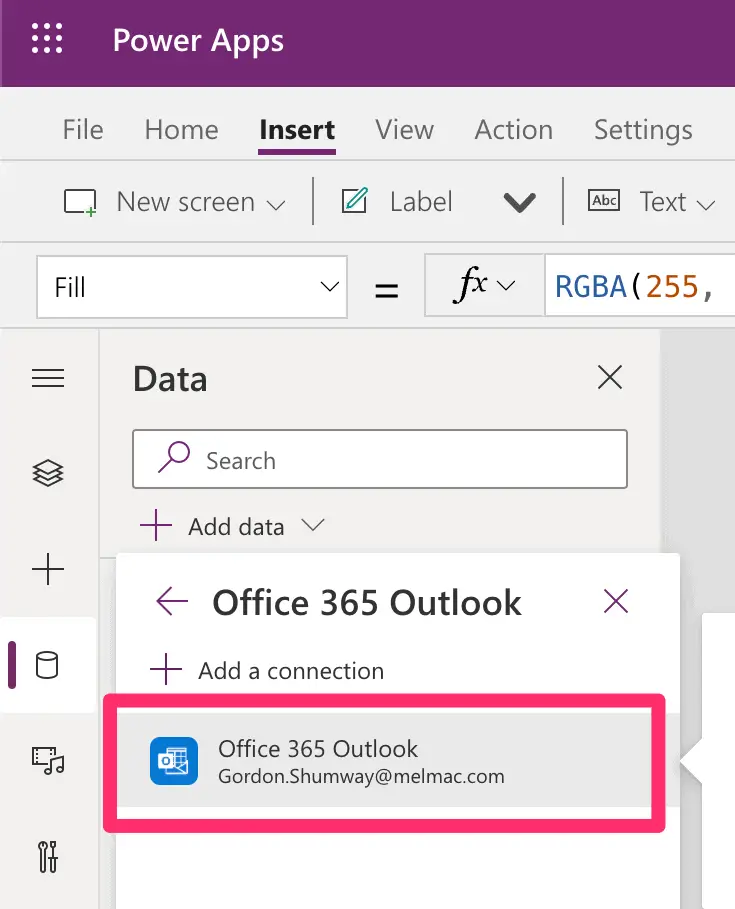
Select Office 365 Outlook account
-
Verify Connection: Connection should now be listed under data
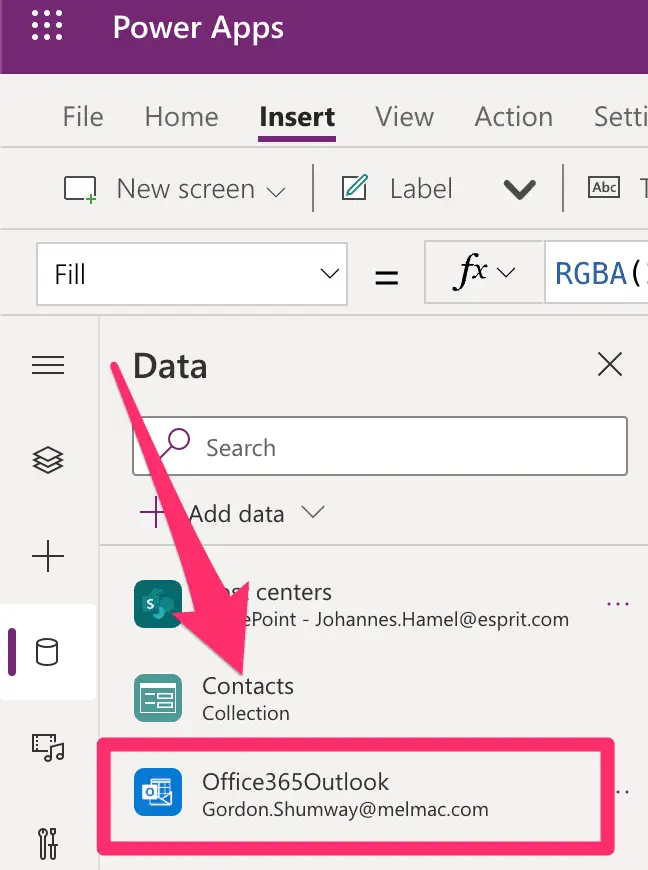
Connection to Office365Outlook
-
Add a button to trigger email sending
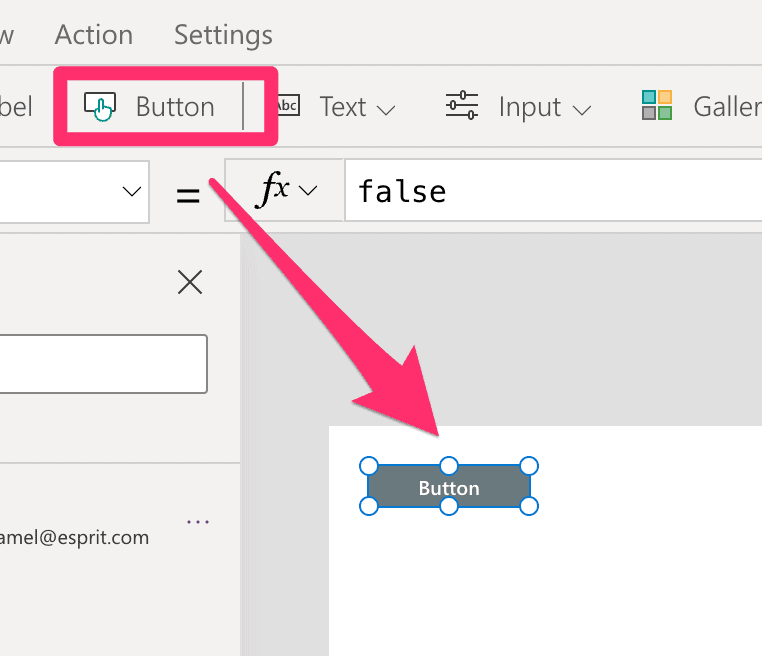
New button
-
Select the button, select ‘OnSelect’ property and set code
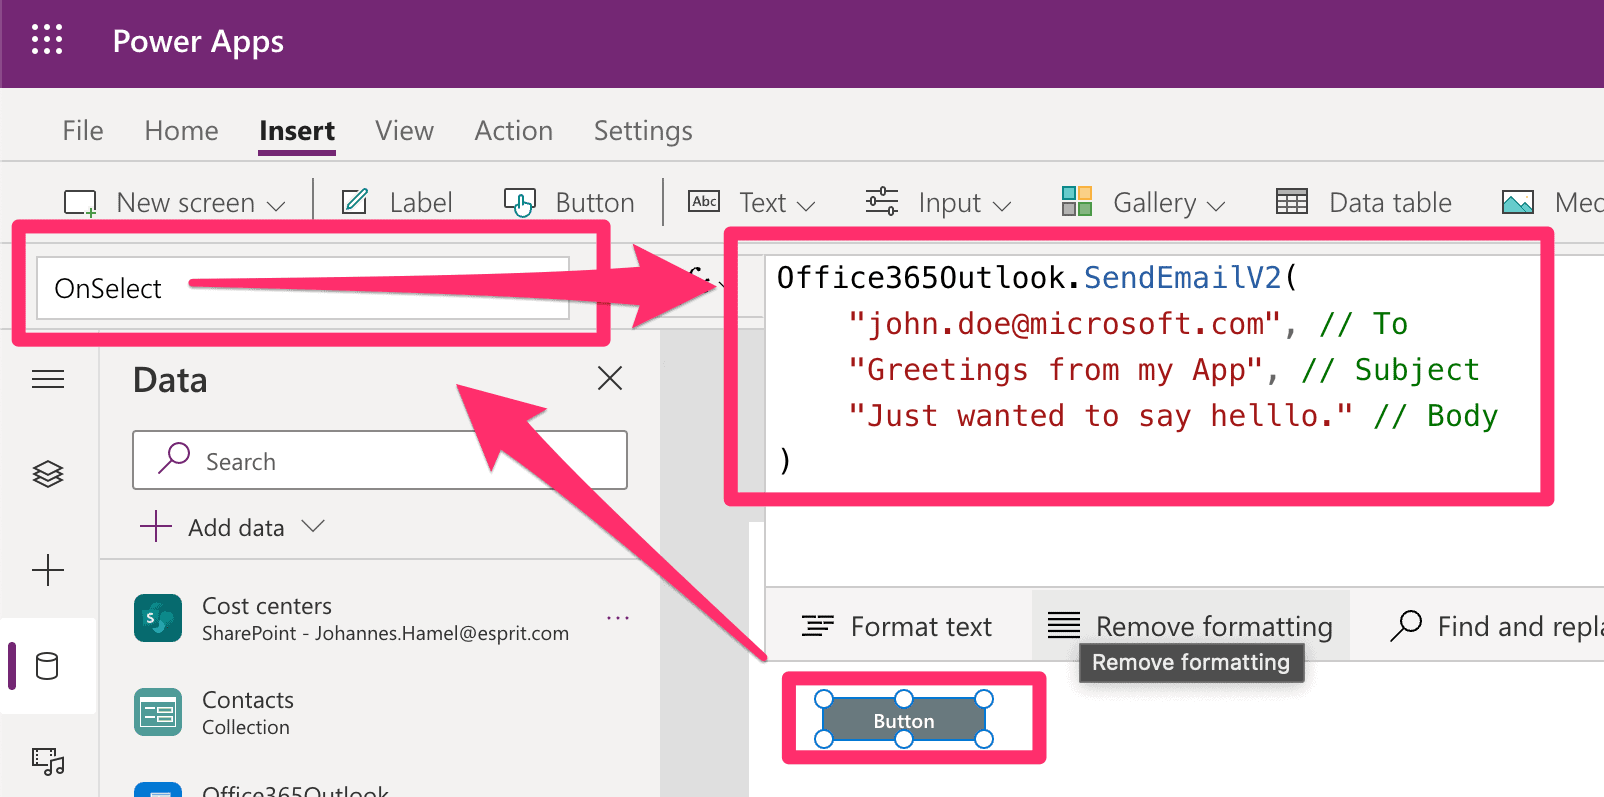
OnSelect property for Button
-
Run the app, click the button and check the mail inbox
Used code for Copy & Paste
Office365Outlook.SendEmailV2(
    "[email protected]", // To
    "Greetings from my App", // Subject
    "Just wanted to say helllo." // Body
)
Multiple recipients
To send an email to multiple recipients with the PowerApps Outlook Connector, you can simply list them by separating them with a semicolon, like shown below:
Office365Outlook.SendEmailV2(
   "[email protected]; [email protected]; [email protected]",
   "Where is my lightsaber",
   "Yo, I've lost my lightsaber? Have you seen it? Cheers Leia"
)
CC and BCC (carbon copy and blind carbon copy)
To add carbon copy recipients you can add the CC and/or BCC option like shown below:
Office365Outlook.SendEmailV2(
    "[email protected]",
    "Short question",
    "What time is it?",
    {
        Cc:"[email protected];[email protected]",
        Bcc:"[email protected]",
    }
)
Priority / Importance
You might want your emails to be marked as import anted. You can achieve this by setting the Importance option like shown in the example below.
Importance can have the following self explanatory values:
- Low
- Normal
- High
Office365Outlook.SendEmailV2(
    "[email protected]",
    "Bookmark me!",
    "See title and do it, NOW!",
    {
        Importance: "High"
    }
)
Email with attachment
To send an email with an attachment, you need to use the Attachment option. The Attachment option expects a table, since there might be multiple attachments. You need to provide:
- Name: The name of the file to be attached.
- ContentBytes: The content of the file, that needs to be attached.
Here is a simple example on how to send an email with an attached image:
Office365Outlook.SendEmailV2(
    "[email protected]",
    "Mail with attachment",
    "Picture attached",

    {
        Attachments:
          Table({
            Name: "picture.jpg",
            ContentBytes: MyImage
            }
        )
    }
)
Email with HTML body
The SendEmailV2 function sends the body as HTML format. You can simply use HTML tags in the body to send an email as HTML.
Note: Different email clients interpret your HTML and CSS code differently. Please check how your mails are displayed in the most common email clients. Do not overdo HTML and CSS! Keep it simple.
See the example below on how to send an email in HTML with PowerApps.
Office365Outlook.SendEmailV2(
    "[email protected]",
    "I have HTML in my body",
    "Hi there!<br/>I am <strong>strong</strong> and I am <i>italic</i>."
)
Send email with hyperlink
To use PowerApps to send an email with a link, just use HTML within the body. The example sends an email with a link to zeitgeistcode.com.
Note: HTML contains a lot of double quotes, that need to be escaped. Use my little online tool to get this done for you.
Office365Outlook.SendEmailV2(
    "[email protected]", // To
    "Link in Email", // Subject
    "Here is the link: <br/><a href=" & Char(34) & "https://zeitgeistcode.com" & Char(34) & " target=" & Char(34) & "_blank" & Char(34) & ">Click me</a>"// Body
);
Send email to current user
Sending an email to the current user is quite easy, just use the User function like this:
Office365Outlook.SendEmailV2(
    User().Email,
    "Subject",
    "Body"
);
Send email to manager
To send an email to the manager of the current user, you can use the Office 365 Users connector.
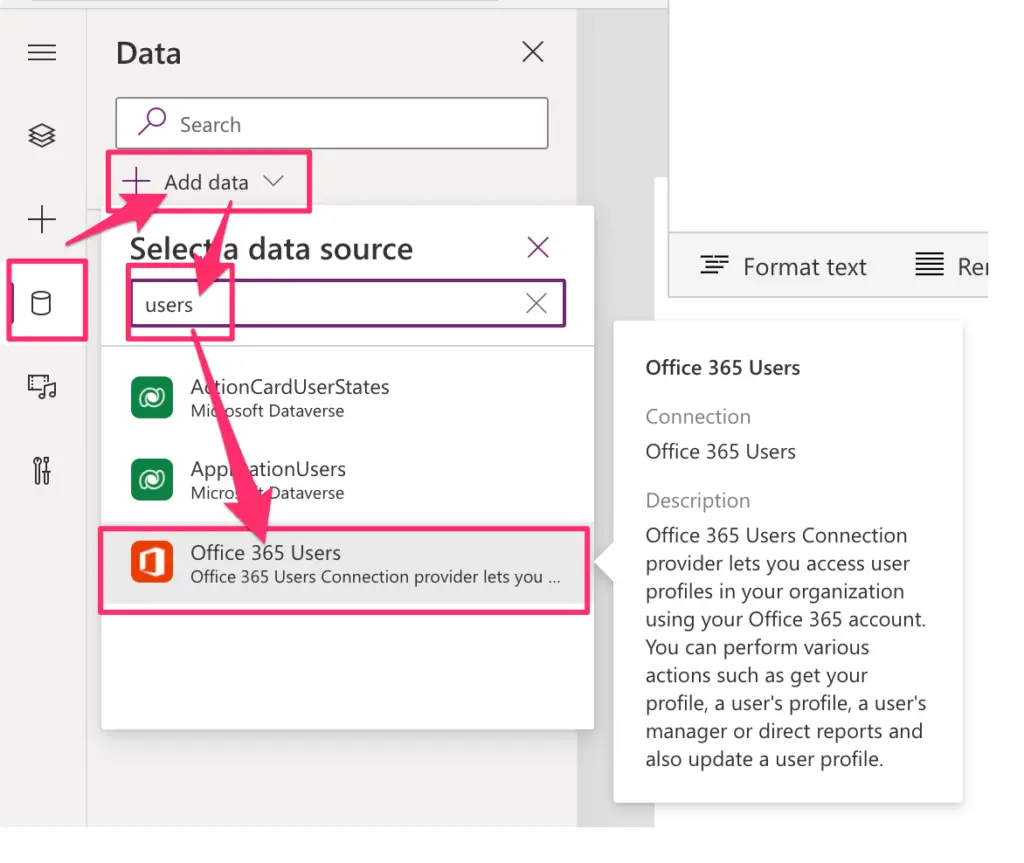
When the connector is set up, you use the Manager function and pass the email of the current user or any other user like shown below:
Office365Outlook.SendEmailV2(
    Office365Users.Manager(User().Email).Mail,
    "Subject",
    "Body"
);
Send email as different user
Sending an email on behalf of another user or a service account can be achieved by setting the ‘From’ option as shown below.
Note: Sending emails from another account can be misused. Therefore you need to have the permission to send an email on behalf of another account. See here how to set the permission to send an email from another account.
Office365Outlook.SendEmailV2(
    "[email protected]", // To
    "Email from another account", // Subject
    "Here is my message.", // body
    {
      From: "[email protected]"
    }
);
Setting reply to
You may want to modify the reply to email address to a noreply email address for instance. The following example sends a PowerApps email with noreply as reply to:
Office365Outlook.SendEmailV2(
    "[email protected]",
    "Thank you",
    "for the JOY!",
    {
        ReplyTo:"[email protected]"
    }
)
Line break in email body
You can use HTML in the body of the emails send with the Office 365 Outlook connector. Therefore you can use the br-tag in to send an email with a new line like this:
Office365Outlook.SendEmailV2(
    "[email protected]", // To
    "Greetings", // Subject
    "Hello,<br/>how are you?" // Body
);
Email with button in body
Displaying a clickable button within an email is quite complicated. There are many email clients. Unfortunately they do not interpret your HTML code the same way. A button looking good in GMail might look awful in Outlook.
I’ve played around with the options discussed in the article “How to Create Beautiful Bulletproof Email Buttons That Absolutely Work“. I found a solution that works for me. I’ve tested Outlook (Client & Web), Gmail and Apple Mail on an iPhone.
Here is what my button looks like within GMail:
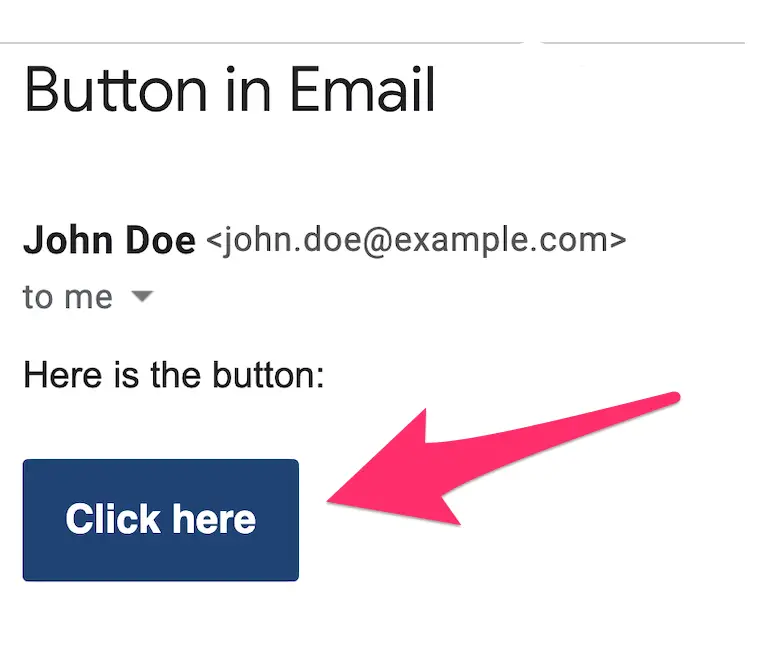
Here is the code for this email. There basically three steps:
- Create a template for your button containing placeholders for ‘button text’ and ‘target llink’
- Replace the placeholders to your need
- Use the adjusted button code within your mail body
It is not very elegant, but works for me. If you have a better solution, let me know!
// define a button template

Set(
    mailButton,
    "<br /> <br /> <style>  a:visited { color: #ffffff; }  </style> <table width=" & Char(34) & "100%" & Char(34) & " cellspacing=" & Char(34) & "0" & Char(34) & " cellpadding=" & Char(34) & "0" & Char(34) & "> <tbody> <tr> <td> <table cellspacing=" & Char(34) & "0" & Char(34) & " cellpadding=" & Char(34) & "0" & Char(34) & "> <tbody> <tr> <td bgcolor=" & Char(34) & "#1f4372" & Char(34) & " style=" & Char(34) & "border-radius: 4px" & Char(34) & "> <a class=" & Char(34) & "maillink" & Char(34) & " href=" & Char(34) & "#link#" & Char(34) & " target=" & Char(34) & "_blank" & Char(34) & " style=" & Char(34) & " padding: 10px 14px; border: 1px solid #1f4372; border-radius: 2px; font-family: Helvetica, Arial, sans-serif; font-size: 14px; color: #ffffff; text-decoration: none; font-weight: bold; display: inline-block; " & Char(34) & " >#text#</a> </td> </tr> </tbody> </table> </td> </tr> </tbody> </table>"
);

// adjust button text and button target link

Set(clickHereButton,
  Substitute(
      Substitute(
        mailButton,
        "#link#",
        "https://zeitgeistcode.com" // target link
       ),
      "#text#",
      "Click here" // button text
    )
);

Office365Outlook.SendEmailV2(
    "[email protected]", // To
    "Button in Email", // Subject
    "Here is the button: " & clickHereButton // Body
);
Launch send email
Sometimes you want your app users to write an email. To make writing an email easier, you provide a button that launches the user’s default mail client and pass data to prefill the mail.
For instance in case you want an email to yourself, you can pass your email address as parameter or the subject. You can even pass the body and CC / BCC. The example how to launch a send mail dialog in the user’s mail program below.
Launch("mailto:[email protected]");

Launch("mailto:[email protected][email protected]"); // with CC

Launch("mailto:[email protected][email protected]"); // with BCC

Launch("mailto:[email protected]?subject=Happy%20Birthday"); // with subject

Launch("mailto:[email protected]?body=Happy%20Birthday"); // with body
Hi Johannes, I’m fairly new to Power Apps and found your site very encouraging. There may be a simple solution to this but I have not been able to get new line code Char(10)/(13) to work when building an email. It simply doesn’t give me a new line. I am not using html.
Hi Stephanie,
just use
1st line,<br>
2nd line
Even if it is the only HTML Tag you use.
Regards,
Johannes
I used
Launch(“mailto:[email protected]?body=Happy, Birthday”)
but it didn’t come in second line
Try this:
Launch(“mailto:[email protected]?body=%0D%0AHappy, Birthday”);
Very helpful… just need one thing… PREVIEW of the eMail using the o365 send. Launch/mailto has a preview, but no real formatting like the 0365 version.
We really want users to verify details before sending… and have fancy formatting.
I am not sure, if I get your requirements correct.
But you can display a ‘Rich text editor’ control with the prepared text. User could verify and edit the content. When everything is ready, there could be a send button that uses ‘RichTextEditor1.HtmlText’ as mail body.
Hello Johannes, I want to put the comment on a button like comment in sharepoint and i don’t know how to do. My address mail is not migrate to Office365.
Can you help me please?
Hi Neil,
I do not get your requirement.
Do you want to implement a comment feature? User enters input and clicks post? Where does the mail is sent?
Regards Johannes
Launch send email is perfect for me. Outlook opens and i can prefill the mail.
I just wonder how I can add a signature (prefilled, at the bottom of the text), just as if I would open Outlook and send a new e-mail.
Unfortunately, there is currently no way to access the logged in user’s email signature.
You can generate your own signature, write it to a variable and append it to the mail body. You may even set email, phone number of the current user within in the custom signature.
See details here:
https://powerusers.microsoft.com/t5/Building-Power-Apps/Using-Outlook-Signature/td-p/205275
Can we use the Dynamic Column Name values from the SharePoint list in the Subject and body of the email?
Yes, you can use any string for body or subject, for example:
Office365Outlook.SendEmailV2( "[email protected]", // To LookUp(MyList, No=5).Name & " is in my list.", // Subject LookUp(MyList, No=5).Name & " is in my list." // Body );hye, may I know how to send an email to a specific user which is the team leader, and for the Team leader I need to choose their email first. I need to know how to send emails to that person when I chose their email only. thankyou 😉
Hi, I do not get exactly what you want, but maybe getting the manager of the logged in user helps:
Office365Users.ManagerV2(User().Email).mailCan you send an email to the result of a people picker?
Of course, just use the email address of the selected person.